By now, you might have understood the StarAgent landscape: talent management, client management, and project management. Now, here, we will take you on a deep dive into the 'Talent' card and all the associated features.
This is definitely one of the most important items, which can bring you a big bang for your productivity buck while you begin working with StarAgent.
The Talent Card
Let’s click on the ‘Talent’ option in the left sidebar to access the Talents page, with a list of all the saved talent profiles.

Haven’t created any profiles yet? Check out our “Add A Talent” article to learn how you can quickly create new talent profiles and manage their details effortlessly on StarAgent.
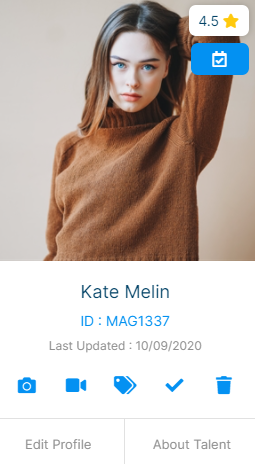
Now, navigate to a particular profile to take a closer look. Each profile displays the talent name, profile picture, and the unique ID assigned for the talent in StarAgent. Under the unique ID, you’ll see the date that indicates the last time the profile was modified or updated.
✍ NB: Unique ID refers to a Unique Identification Number, which can be used to locate a talent from any page in StarAgent using its ‘Search’ functionality. |
Along with these, there are NINE main icons present on the talent profile, that are worth getting to know:
1. Photos
You can click on the ‘Photos’ option on the left of the profile to upload and manage images of the talent.

- To start uploading new images, you may further select 'Add Photos', choose the file to upload, and hit 'Start Upload'.

- Now if you wish to view/manage already uploaded images, tap 'View & Manage'.

✨ Tip: Read this guide to learn more about uploading and managing images on talent profiles. |
2. Videos
Upload short video samples of the talent's works or a demo reel by clicking on the ‘Video’ option on the profile.

You can also scroll to the bottom to view all uploaded videos, delete any video which is no longer needed, and change the video status.

✨ Tip: Read more about uploading and managing videos in this article. |
3. Files
Files are a convenient way to store and keep track of all the essential documents for talents. Clicking on this icon will list out all the files that have been uploaded in the respective folders.

To upload a new attachment, just click the 'Choose File' button and select files to upload from your computer or other cloud sources. Enter in a name, pick an expiry date for the file, select the folder to which you want to add the file, and hit 'Upload'.

Once you are done, the file will be successfully uploaded to StarAgent and stored with your talent's profile.
✍ NB: You can add new folders to the 'Files' and edit/delete already created folders by going to Settings >> Manage File Folders. |
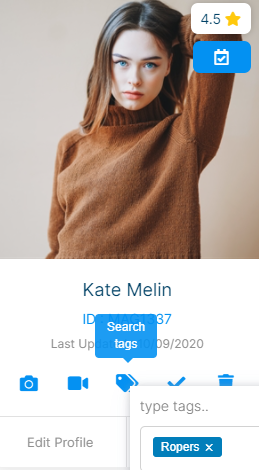
4. Search Tags
Tags in StarAgent are keywords used to label your talents, clients, and projects, based on the details you know about them. You can assign as many tags as you want for each talent by going to 'Search Tags' option on the profile, typing in the name of the tags in the tag window, and hitting 'Save'.
✨ Tip: You can read more about creating and assigning tags here. |
5. Status
Status of talents let everyone from your agency identify if a particular talent is ready to take up tasks or not. A blue tick mark on the profile indicates that the talent is currently available ('Active') to book for events, while a red cross mark denotes that he/she isn't available ('Inactive') at that specific point of time.

✨ Tip: You can set the Talent Status to 'Active' or 'Inactive' by clicking on the Cross Mark (if it is already set to Inactive) or Tick Mark (if it is set to Active), on the profile. |
6. Delete
When the details about talents are no longer needed, you can delete them from StarAgent by clicking on the 'Delete' option.

However, please note - deletion is permanent. Means, if a talent profile has been deleted once, it cannot be recovered at any cost. So, if you want to remove the talent data temporarily, it is better to deactivate the talent profile by setting its Status to 'Inactive' instead of deleting.
7. Edit Profile
On StarAgent, you can edit already entered talent details whenever needed, by clicking on the 'Edit Profile' button.

On the next page, edit the needed fields, and then hit 'Update'.
8. About Talent
You can use the ‘About Talent’ tab on the profile to view complete details of the talent in a well-organised manner.

It is also possible to change the status of the talent from here.
9. Rating
This signifies the average ratings made by your clients for a particular talent. They are displayed on a scale of one to five stars on the talent profile, and make your searching process much more comfortable.

✨ Tip: Under the 'Advanced Search' option, you can choose to filter out talents above specific star ratings, if needed. |
10. Bookings
You can use the 'Bookings' option on the talent profile to view all the bookings of that particular talent.
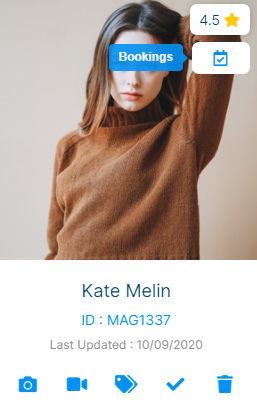
You can also choose to share the talent's booking calendar or the talent's availability calendar with others in your agency by clicking on the 'Export Full Calendar' tab or 'Export Availability' tab respectively and then sharing it through the team messaging or direct messaging channels on StarAgent.

✨ Tip: Discover more about 'Booking' procedures in StarAgent here. |