Do you have a difficult time assigning work to your agency members? Then you’re not alone. The good news is StarAgent now has features to help you keep everyone and everything moving forward productively.
Put these five steps into action daily/weekly so you can successfully assign, manage, and keep your team’s tasks on track.
The Five-Step Guide To Task Management
#1. Figure Out the Workload For The Day/Week
Put together all the projects your team is responsible for. Determine the deadlines and time schedules required for each.

Are these bigger projects, or are these smaller in scope? How much of each project’s process is your agency responsible for? Make a list based on these.
#2. Create Actionable Steps
Once you have a big picture understanding of your agency’s projects, break them down into smaller actionable steps, or to-do’s and add them to your list.

For example, you might have a task to assign models for a video shoot for an upcoming campaign, then one of your agency members might be responsible for sending portfolio packages to them, another person might be accountable for handling conversations with the client, and someone else might be chargeable of conducting discussions with the talent, and so on.
#3. Prioritize Tasks
Identify the priority of each task based on importance and urgency. For tasks that are important and with closer due dates, mark them as ‘Important/Urgent’ in your list, and for tasks that are important but with distant due dates, mark them for ‘Important/Not Urgent’.

This way, you’ll know what your team members need to tackle first and can better schedule their work.
#4. Assign Tasks
- Click on the ➕ (Plus) icon on the top right of your dashboard screen, and select ‘Tasks’.

✨ Tip: ‘+Task’ circular tab on the dashboard is an easy way to access the ‘Add New’ task page. |
- On the window that appears, fill out Task Title, Start & End Dates, Project Name, and Staff who are required to work on the task. It’s better to assign a task to only one user, so there’s no confusion about who’s responsible for the work.
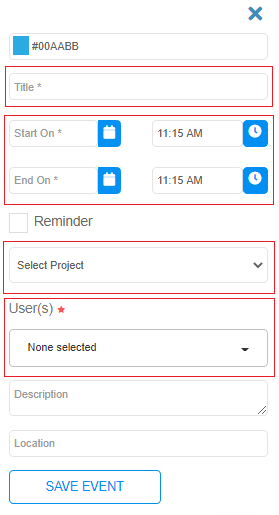
✨ Tip: Make sure you’re matching the right employee to each task. Check the ‘User Calendar’ and take into account their availability, to avoid any conflicts. |
- Use the Task Description to mention if the work is of ‘High Priority’, ‘Medium Priority’, or ‘Low Priority’ so that your team can work accordingly.

✨Tip: Give more details, instructions, or context to the task in the ‘Description’ section if needed. |
- Use the option to ‘Add Color’ for tasks (consider assigning colour-code rules) so that it will become easy for your team members to pick out tasks/events. For instance,you may add Red for urgent tasks, Amber for not immediate but needs attention tasks, Green for low priority tasks, Grey for team meetings, and so on.

- When you’ve completed a task, click the checkmark next to ‘Reminder’, for all the involved team members to receive notifications on tasks prior to its deadline.

- Hit ‘Save Event’ to finish.

#5. Manage Workloads
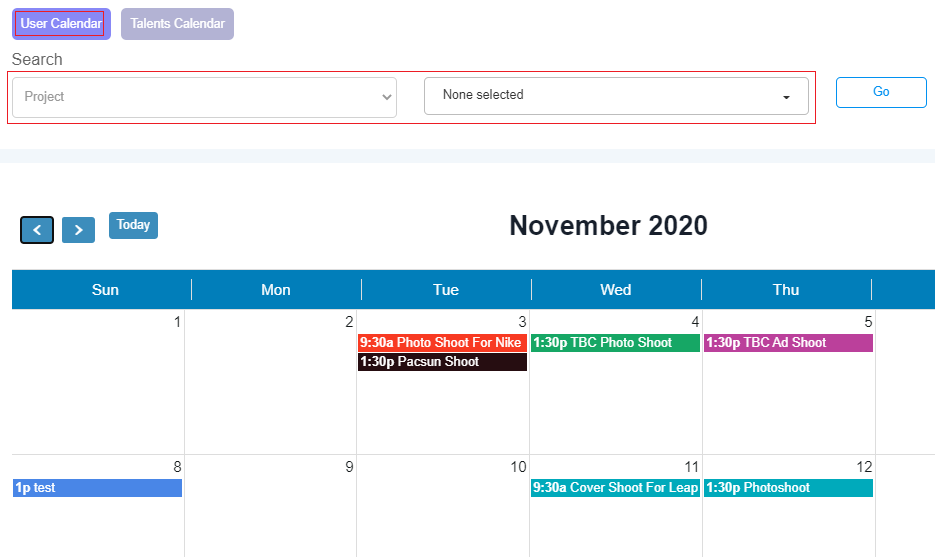
Track your team member’s current workloads by going to the ‘User Calendar’. Using the calendar filtering options, you can quickly visualize the workload for a specific day, week, or month for each employee. If you feel someone is overloaded with responsibilities, then check and see who is free to take on new tasks, and reassign them accordingly.
✨ Tip: When you reassign tasks, make sure to communicate with your team members about the changes, so they understand why they’re suddenly being pulled in a different direction. |